I first shared this Pineapple Dream Delight Dessert recipe years ago, right after a sweltering summer party. My oven had broken, and I was in a panic. I needed something spectacular that wouldn’t heat up the kitchen. If you’re looking for other no-bake tropical treats, you might love our Tropical Carrot Banana Pineapple Muffins for a sunny breakfast option.
That’s when I threw this together. It was a total experiment. I used what I had: some graham crackers, a can of pineapple, and a tub of Cool Whip in the freezer. The result was pure magic.
Everyone went crazy for it. They kept asking for the recipe, convinced it was some complicated bakery secret. My little no-bake creation was the star of the show. I knew right then I had to publish it for all of you.
Recipe Overview
- Cuisine: American
- Category: Dessert
- Prep Time: 20 minutes
- Cook Time: 0 minutes
- Total Time: 4 hours 20 minutes (includes chilling)
- Servings: 12 bars
Why This Recipe is So Special
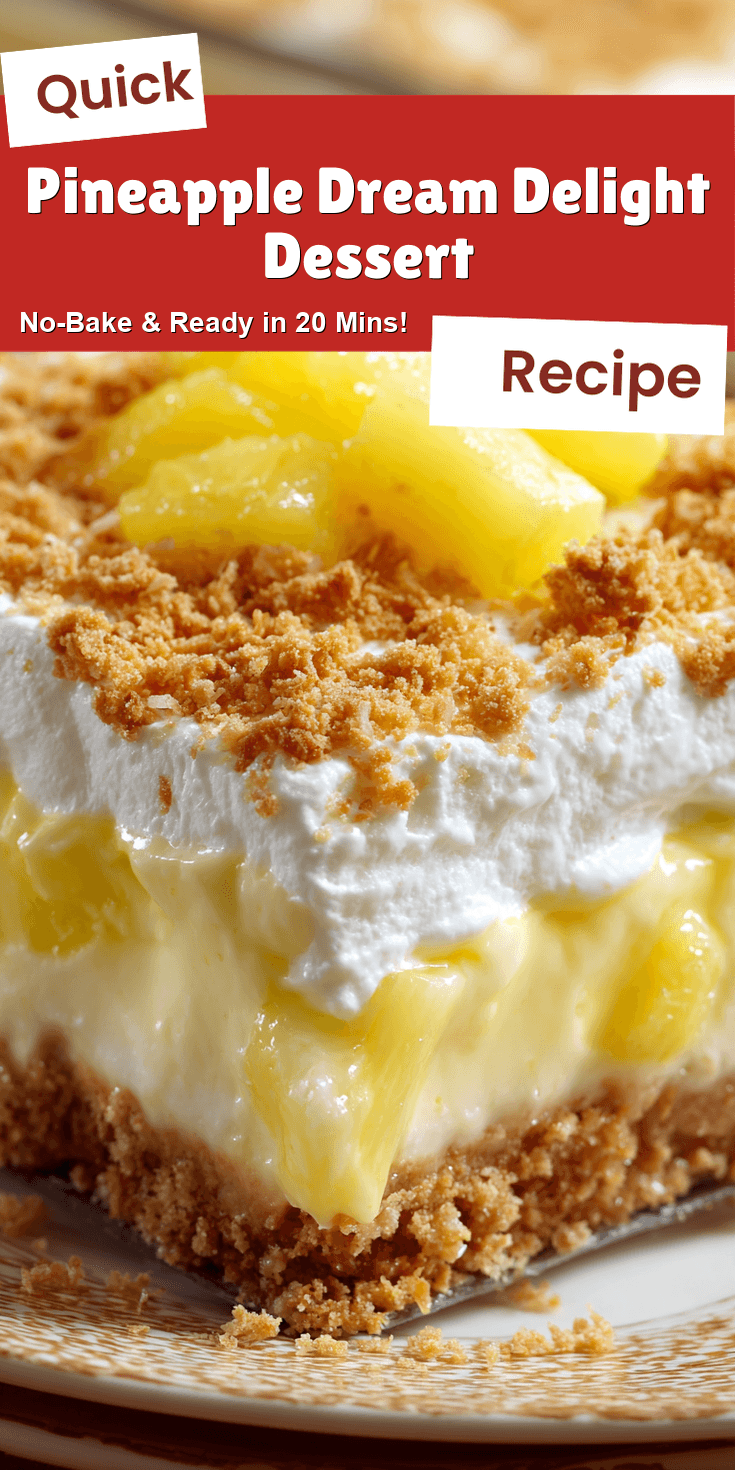
This dessert is special because it feels like a tropical vacation in a pan. It’s a classic pineapple lush, but with my own little twist. The layers create this wonderful mix of textures that just works.
Pineapple Dream Delight Dessert Recipe
The Full Ingredient List
My Step-by-Step Method
Notes
Enjoy your homemade Pineapple Dream Delight Dessert Recipe!
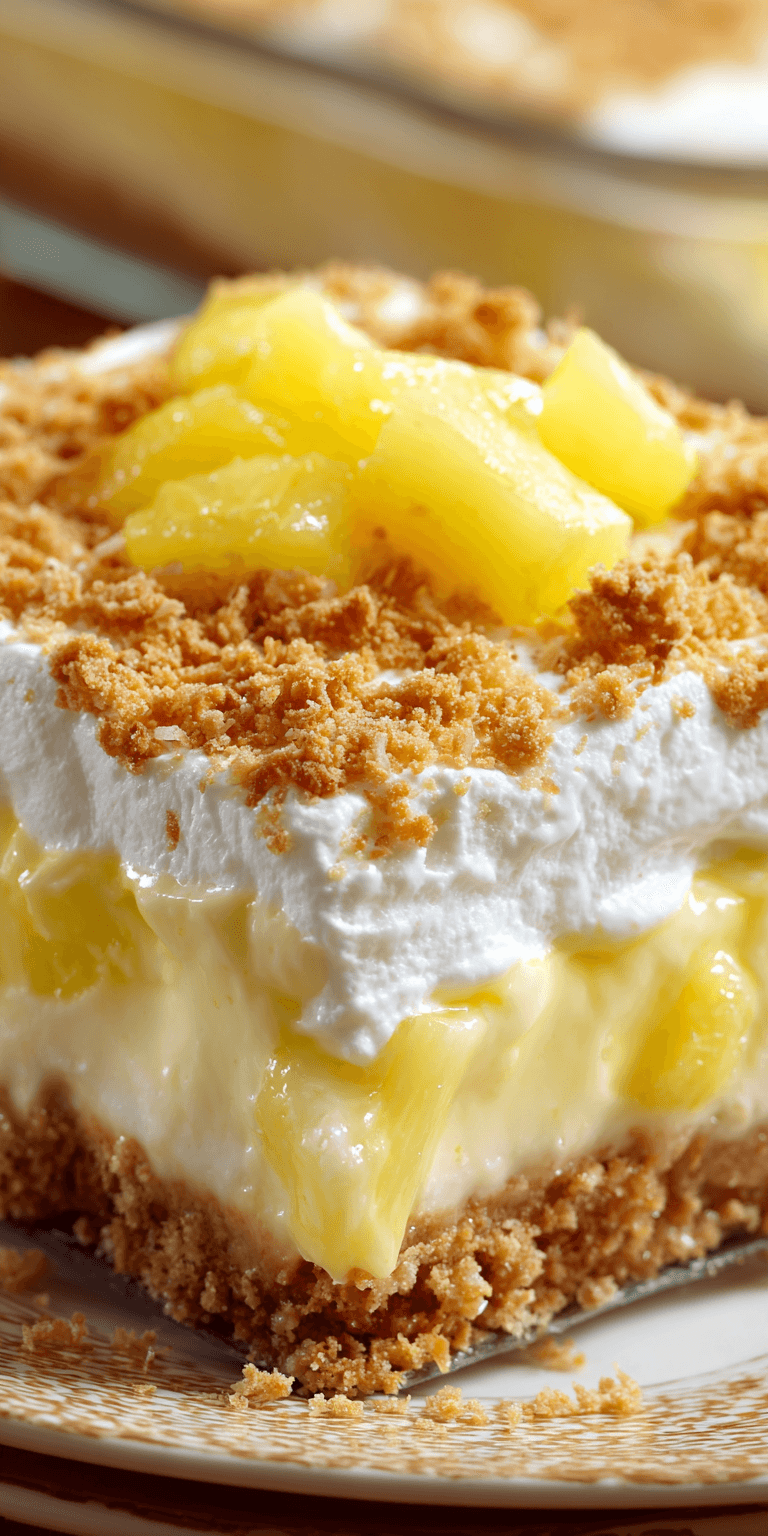
You get a buttery, crunchy crust. Then a smooth, creamy cheese layer. The star is that fluffy, sunny pineapple filling on top. It’s sweet, tangy, and so refreshing. For another fantastic baked dessert that celebrates pineapple, try our stunning Pineapple Upside-Down Banana Cake Bread.
The best part? You don’t even turn on the oven. It’s the ultimate hot-weather lifesaver. It looks fancy but is honestly one of the easiest things you’ll ever make. I love that about it.
The Full Ingredient List
Gathering your ingredients is the first step to this tropical food dream. Here’s everything you’ll need. I promise, it’s all simple stuff you can find anywhere.
- 2 cups graham cracker crumbs
- 1/2 cup (1 stick) unsalted butter, melted
- 1/4 cup granulated sugar
- 1 (8 oz) package cream cheese, softened
- 1 cup powdered sugar
- 1 (8 oz) tub Cool Whip, thawed, divided
- 1 (20 oz) can crushed pineapple in juice, NOT drained
- 1 (3.4 oz) box instant vanilla pudding mix
My Step-by-Step Method
Follow these steps and you really can’t go wrong. I’ve made this dozens of times, and this order is the key to perfect layers. Let’s get started!
- First, make the crust. In a medium bowl, mix the graham cracker crumbs, melted butter, and granulated sugar until it looks like wet sand.
- Press this mixture firmly and evenly into the bottom of a 9×13 inch baking dish. I use the bottom of a measuring cup to really pack it down. Pop it in the fridge to set while you make the next layer.
- For the cream cheese layer, beat the softened cream cheese and powdered sugar in a large bowl until it’s completely smooth. No lumps allowed!
- Gently fold in 1 cup of the Cool Whip into the cream cheese mixture until it’s all one color. Spread this evenly over your chilled crust.
- Now, the pineapple layer. In a clean bowl, whisk together the entire can of crushed pineapple (with its juice) and the dry pudding mix. It will start to thicken almost right away.
- Let the pineapple mixture sit for about 3 minutes to thicken up a bit more. Then, carefully fold in the remaining Cool Whip. You want it to be light and fluffy.
- Spread this final pineapple cloud over the cream cheese layer. Be gentle so you don’t mix the layers.
- Cover the dish and chill for at least 4 hours, but overnight is even better. This chill time is non-negotiable for clean slices.
- When you’re ready to serve, slice into bars. For a pretty finish, you can add a little extra graham cracker crumb or a maraschino cherry on top.
My Top Tips for Success
- Softened Cream Cheese is Key: Take the cream cheese out of the fridge an hour before. Room-temperature cheese blends smoothly and avoids a lumpy layer.
- Drain or Not to Drain? Do NOT drain the pineapple! The juice is needed to activate the pudding mix. Using the whole can gives you the perfect flavor and texture.
- Chill Thoroughly: I know it’s hard to wait, but please do. Letting it set overnight makes it firm enough to cut beautiful, clean bars that hold their shape.
- Thaw Cool Whip: Let the Cool Whip thaw in the fridge. If it’s still frozen, it’s hard to fold and can make your layers dense instead of light.
Common Mistakes to Avoid
I’ve learned from my own mistakes so you don’t have to! Here are the big ones to watch for.
Using cold cream cheese is the number one issue. If your cheese is cold, you’ll get little lumps in your middle layer. It still tastes good, but the texture isn’t as dreamy.
Another mistake is not packing the crust down firmly. A loose crust will crumble when you try to cut the bars. Really press it in there to form a solid base.
Finally, don’t skip the chilling time. If you try to cut it too soon, the layers will run together and look messy. Patience makes perfect here.
NUTRITION INFORMATION
- Serving Size: 1 bar
- Calories: ~320
- Fat: 16g
- Saturated Fat: 10g
- Carbohydrates: 42g
- Sugar: 33g
- Protein: 3g
FREQUENTLY ASKED QUESTIONS
Can I use fresh pineapple instead of canned?
I don’t recommend it for this recipe. Canned pineapple in juice gives you the right amount of liquid to activate the pudding mix. Fresh pineapple can be too watery or too acidic, which might keep the pudding from setting properly.
Can I make this dessert ahead of time?
Absolutely! In fact, I think it’s better the next day. You can make it up to 24 hours in advance. Just keep it covered tightly in the refrigerator until you’re ready to serve.
What can I use instead of Cool Whip?
You can use an equal amount of homemade sweetened whipped cream. Just whip 2 cups of heavy cream with 1/4 cup of powdered sugar until you get stiff peaks. The texture will be a bit softer but just as delicious.
Leave a Reply! (I’d Love to Hear From You!)
Did you make this tropical dream come true in your own kitchen? I would be so thrilled to hear how it turned out for you! Tell me in the comments below—did your family love it? Did you add your own special twist? If you enjoyed this easy dessert, explore our full collection of Pumpkin Dessert Recipes for cozy fall baking ideas. Your stories and questions are my favorite part of this baking journey. Thank you so much for baking with me today!