Hey there, breakfast lovers! If you’re looking for a quick, fun, and delicious way to start your day, these Mini Breakfast Omelets are just what you need. They’re perfect for busy mornings or feeding a crowd with minimal effort!
These little egg muffins are not only super easy to whip up, but they’re also customizable. Whether you’re a veggie fan or a meat lover, you can make them your own. Plus, they’re great for meal prep!
Stick with me, and I’ll show you how to make these bite-sized wonders step by step. Even if you’re new to cooking, you’ve got this! Let’s dive into this simple recipe and get cooking.

Why You’ll Love Mini Breakfast Omelets
These Mini Breakfast Omelets are a game-changer for anyone who wants a hearty, portable breakfast. They’re packed with flavor, easy to make, and ideal for picky eaters since everyone can choose their fillings!
- Quick to Prepare: You can whip up a batch in under 40 minutes, perfect for those rushed mornings when you still want something homemade.
- Customizable: Add your favorite ingredients like veggies, cheese, or turkey sausage to suit any taste or dietary need in your family.
- Meal Prep Friendly: Make a big batch, freeze them, and reheat for a grab-and-go breakfast that saves you time during the week.
- Kid-Friendly: Their small size and fun muffin shape make them a hit with kids, plus you can sneak in some healthy veggies!
Ingredients for Mini Breakfast Omelets
Let’s gather everything you need for these tasty little bites. The ingredients are simple, and you likely have most of them in your kitchen already. Here’s the list to get started!
Main Ingredients:
- 36 tater tots (for the crust in a standard muffin pan)
- 10 large eggs (the base of the omelet)
- 1/4 cup milk (for a fluffier texture)
For the Filling:
- 1 cup shredded cheese (cheddar or colby jack work great)
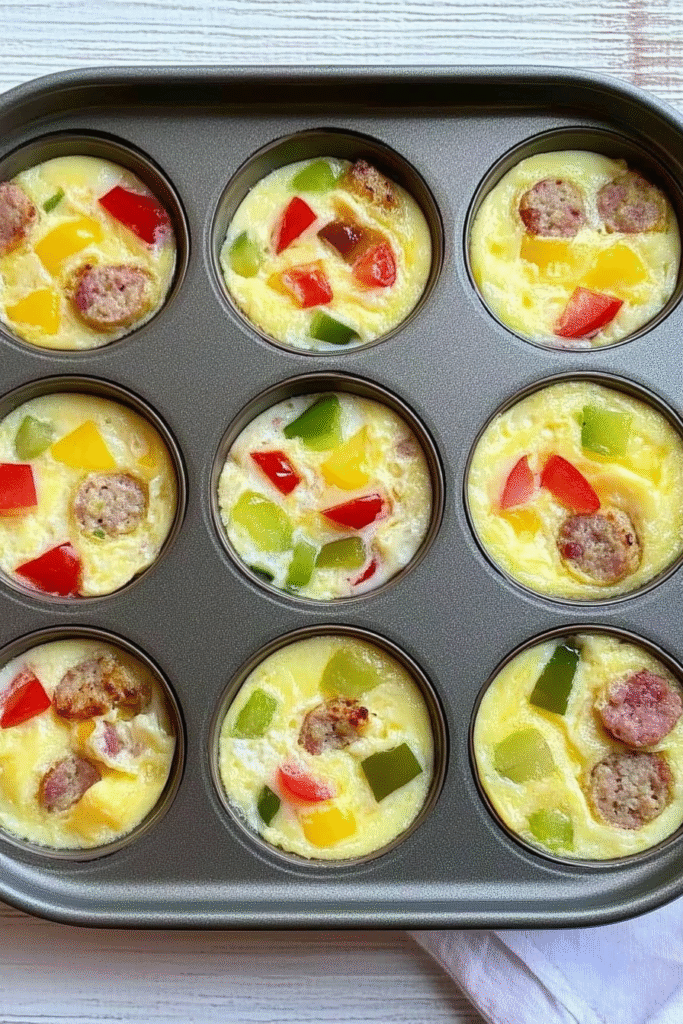
- 1-2 cups meat & veggies of choice (like turkey sausage and bell peppers)
Important Ingredient Notes:
• Use frozen tater tots for the best crust texture.
• Pick fresh veggies for added flavor and nutrition.

Mini Breakfast Omelets: Easy & Customizable Recipe for Busy Mornings
- Total Time: 40 minutes
- Yield: 12 mini omelets 1x
Description
Hearty, customizable, and perfect for busy mornings, these Mini Breakfast Omelets are easy to make, freezer-friendly, and packed with your favorite fillings. A fun and delicious way to start your day!
Ingredients
- 36 frozen tater tots
- 10 large eggs
- 1/4 cup milk
- 1 cup shredded cheese (cheddar or colby jack)
- 1–2 cups diced meat and vegetables (e.g., turkey sausage, bell peppers)
Instructions
- Preheat oven to 400°F (200°C) and grease a muffin pan. Microwave tater tots until soft, place 3 in each muffin cup, and press to form crusts.
- Bake crusts for 10 minutes until lightly golden. Reduce oven to 350°F (175°C).
- Distribute chosen meat and veggie fillings evenly into the muffin cups.
- Whisk eggs with milk, salt, and pepper. Pour mixture into cups, filling about 90% full. Top with shredded cheese.
- Bake for 20 minutes until set. Cool slightly before removing from pan. Serve warm or freeze for later.
Notes
Use silicone liners or grease muffin pans well to prevent sticking. Customize with your favorite veggies, meats, and cheeses. Perfect for meal prep!
- Prep Time: 15 minutes
- Cook Time: 25 minutes
- Category: Breakfast
- Method: Baking
- Cuisine: American
Nutrition
- Serving Size: 1 mini omelet
- Calories: 130
- Sugar: 1g
- Sodium: 220mg
- Fat: 8g
- Saturated Fat: 3g
- Unsaturated Fat: 4g
- Trans Fat: 0g
- Carbohydrates: 6g
- Fiber: 1g
- Protein: 8g
- Cholesterol: 105mg
Step-by-Step Instructions
Ready to cook? Making these Mini Breakfast Omelets is a breeze, even if you’re a beginner. Follow these steps, and you’ll have a delicious breakfast in no time!
Step 1: Prepare the Tater Tot Crust
Preheat your oven to 400°F (200°C) and generously grease a standard muffin pan. Thaw 36 tater tots in the microwave until soft, then place 3 in each muffin cup. Smash them with a small cup to form a crust.
Step 2: Bake the Crust
Pop the muffin pan into the oven for 10 minutes to crisp up the tater tot crust. Once done, take it out and lower the oven temperature to 350°F (175°C). The crust should be slightly golden.
Step 3: Add Fillings
Evenly distribute your chosen fillings into each muffin cup. I love using diced turkey sausage and bell peppers, but feel free to add spinach, onions, or whatever you have on hand. Keep it balanced!
Step 4: Pour Egg Mixture & Bake
Whisk together 10 eggs with 1/4 cup milk and a pinch of salt and pepper. Pour the mixture into each cup, filling about 90% full. Top with shredded cheese and bake at 350°F for 20 minutes until set.
Expert Tips
Want to make your Mini Breakfast Omelets even better? Check out these handy tips to elevate your breakfast game!
- Prevent Sticking: Grease your muffin pan well or use silicone liners to ensure the omelets pop out easily after baking. A quick spray of cooking oil works wonders!
- Even Cooking: Don’t overfill the cups with egg mixture, as they expand while baking. Stick to about 90% full to avoid spills and ensure even cooking.
- Freezing Tip: Cool completely before freezing. Lay them on a tray for 2 hours, then transfer to a freezer bag. Reheat in the microwave for a quick meal.
Variations & Alternatives
Not everyone loves the same flavors, so here are some fun ways to switch up your Mini Breakfast Omelets. Get creative with these ideas!
- Vegetarian Option: Skip the meat and load up on veggies like spinach, tomatoes, and mushrooms. Add feta cheese for a tangy kick that pairs perfectly with eggs.
- Low-Carb Version: Omit the tater tot crust and double up on fillings like zucchini or broccoli. It’s just as tasty and fits a keto or low-carb diet.
- Spicy Twist: Add diced jalapeños or a dash of hot sauce to the egg mixture for a spicy breakfast. Top with pepper jack cheese for extra heat!
What to Serve With Them
These little omelets are great on their own, but pairing them with sides can make breakfast extra special. Here are some ideas to try!
- Fresh Fruit Salad: A mix of berries, melon, and banana adds a sweet, refreshing contrast to the savory omelets. It’s also a healthy way to balance the meal.
- Whole-Grain Toast: Serve with a slice of buttered toast for a classic breakfast vibe. It’s perfect for soaking up any extra eggy goodness on your plate.
- Smoothie: Blend up a quick smoothie with spinach, banana, and almond milk for a nutritious drink that complements the protein-packed omelets.
Häufig gestellte Fragen (FAQ)
How to make mini omelettes?
To prepare Mini Breakfast Omelets, beat 6 eggs in a bowl and season with salt and pepper. Preheat a greased muffin tin in the oven at 350°F (180°C).
Fill the cups halfway with the egg mix, add fillings like turkey, cheese, or veggies, and bake for 15-20 minutes until golden and set. Perfect for on-the-go!
Do you add milk to eggs for an omelet?
Yes, adding milk to eggs for Mini Breakfast Omelets can make the texture softer and fluffier. About a tablespoon of milk or cream per egg works well. This prevents dryness. Whisk the mixture thoroughly before pouring into the muffin tin. Dairy-free? Use plant-based milk.
It’s optional, based on preference.
How to make a small omelette?
For a small omelette or Mini Breakfast Omelets, whisk 2-3 eggs in a bowl. Heat a small pan (about 8 inches) with butter or oil. Pour in the eggs and cook on medium heat until set. Add fillings like cheese or veggies, fold, and cook briefly.
What are good fillings for omelettes?
Good fillings for Mini Breakfast Omelets are endless and customizable. Classics include diced turkey, shredded cheese like cheddar, and chopped veggies like peppers, spinach, or tomatoes. Mushrooms, onions, or herbs like chives also work great. Keep fillings small for even cooking.
What goes well inside an omelette?
Inside Mini Breakfast Omelets, many ingredients shine. Popular choices are turkey sausage, cheeses like mozzarella, and veggies like zucchini or broccoli. Fresh herbs like parsley add flavor. Use leftovers like cooked potatoes too. Dice finely and pre-cook if needed for best results.
Conclusion
These Mini Breakfast Omelets are a fantastic way to enjoy a hearty, customizable breakfast without spending hours in the kitchen. They’re versatile, freezer-friendly, and loved by all ages!
Why not give this recipe a try? I’d love to hear how it turns out for you! Drop a comment below with your favorite fillings or any tweaks you made. Let’s get cooking!


