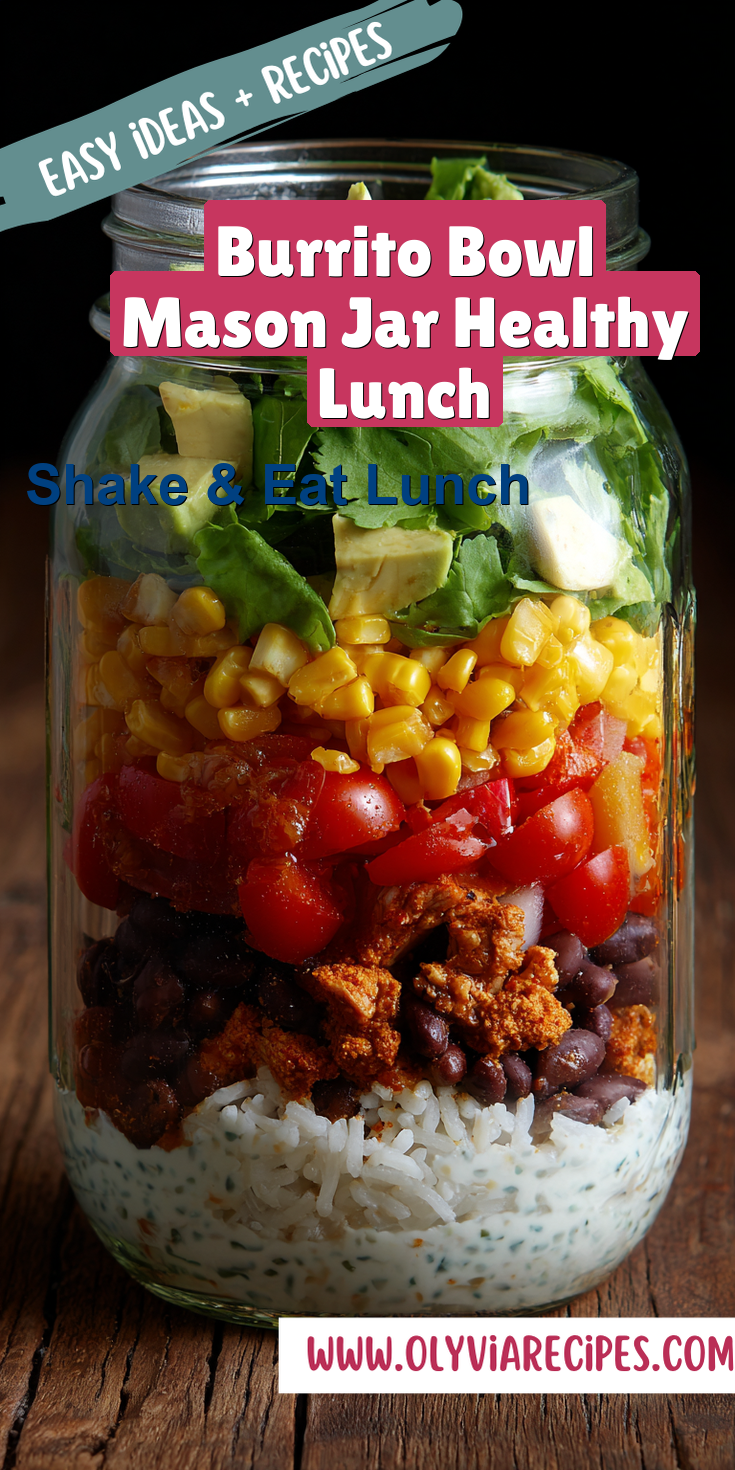

I have a confession to make. For years, I was the person who would stare into the fridge at noon, completely defeated, and end up with a sad, soggy sandwich. My baking projects got all my love, but my weekday lunches were an afterthought. That all changed when I discovered the magic of the Burrito Bowl Mason Jar Healthy Lunch. If you’re looking for a fantastic starting point, my recipe for Mason Jar Chicken Burrito Bowls is a perfect introduction to this method.
I published this recipe a few years ago after a particularly hectic week. I needed something I could grab and go. Something that wouldn’t wilt by lunchtime. And most importantly, something that tasted like I actually cared about myself. This jar technique was my game-changer.
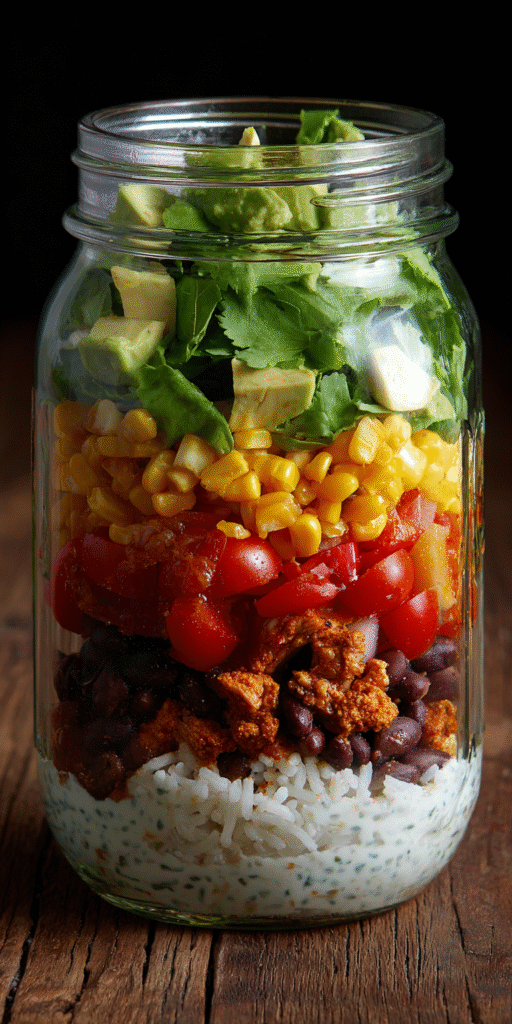
It’s more than just a salad in a jar. It’s a complete, portable feast. You get layers of flavor and texture that stay perfect until you’re ready to eat. The best part? You can make a whole week’s worth in one go. Let me show you how I build my favorite version.
Recipe Overview
- Cuisine: Mexican-inspired
- Category: Meal Prep, Portable Lunch
- Prep Time: 25 minutes
- Cook Time: 20 minutes (for rice)
- Total Time: 45 minutes
- Servings: 4 jars
Why This Recipe is So Special
The magic is all in the layering. You don’t just toss everything in. You build it with purpose. The wet ingredients go on the bottom, far away from the dry, crunchy stuff on top.
This creates a perfect barrier. Your crispy tortilla strips and fresh lettuce won’t touch the dressing until you shake it all together. It’s a simple trick, but it makes all the difference. Your lunch stays fresh and vibrant for days.
I also love how flexible it is. Think of this as a blueprint. Don’t have black beans? Use pinto. Want more protein? Add some shredded chicken. For a dedicated chicken version that’s a total crowd-pleaser, check out my guide to Mason Jar Chicken Burrito Bowls: Your Easy Meal Prep Win!.
The Full Ingredient List
This is my go-to combination. It hits all the notes I crave—creamy, crunchy, fresh, and a little spicy. Gather your favorite wide-mouth quart-sized mason jars first!
- For the Cilantro-Lime Dressing:
- 1/2 cup plain Greek yogurt
- Juice of 2 limes
- 1/4 cup fresh cilantro, chopped
- 1 tablespoon olive oil
- 1 small garlic clove, minced
- Salt and pepper to taste
- For the Jar Layers:
- 1 1/2 cups cooked Mexican rice, cooled
- 1 (15 oz) can black beans, rinsed and drained
- 1 cup corn kernels (fresh, frozen/thawed, or roasted)
- 1 large bell pepper, diced
- 1 cup cherry tomatoes, halved
- 1 avocado, diced (add right before eating for best results)
- 4 cups chopped romaine lettuce
- 1/2 cup shredded cheddar or cotija cheese
- Tortilla strips or crushed chips for topping
My Step-by-Step Method
I treat this like building a delicious, edible tower. Take your time with the layers. It’s almost as satisfying as frosting a layer cake!
- First, make your dressing. Whisk all the dressing ingredients in a small bowl until smooth. This creamy, tangy base is what ties everything together.
- Grab your clean, dry mason jars. Start by dividing the dressing evenly among the bottoms of the four jars.
- Now, layer in this order: black beans, corn, bell pepper, and cherry tomatoes. These sturdier veggies sit happily in the dressing.
- Next, add a big spoonful of cooled Mexican rice. This layer acts as another great barrier for the ingredients above.
- If you’re using avocado, add it now. Then, gently pack in the chopped romaine lettuce until the jar is nearly full.
- Top it all off with the shredded cheese and a handful of tortilla strips. Screw the lids on tightly!
- Store your jars upright in the fridge. When you’re ready to eat, just shake the jar vigorously to mix everything, or dump it all into a big bowl.
My Top Tips for Success
- Cool Your Rice: Make sure your Mexican rice is completely cool before adding it to the jar. Warm rice will create steam and wilt your lettuce.
- Dry Your Greens: After washing your romaine, spin it or pat it completely dry. Any extra water will make things soggy.
- Pack It In: Don’t be shy! Gently press each layer down with a spoon. This removes air pockets and helps prevent shifting.
- Avocado Timing: For the absolute best results, add diced avocado the morning you plan to eat the jar, not days in advance.
Common Mistakes to Avoid
The biggest mistake is putting the dressing on top. It seems logical, but it’s a trap! The heavy dressing will sink and drown your delicate lettuce long before lunch.
Burrito Bowl Mason Jar Healthy Lunch Recipe
The Full Ingredient List
My Step-by-Step Method
Notes
Enjoy your homemade Burrito Bowl Mason Jar Healthy Lunch Recipe!
Nutrition Information
Always put the wettest ingredients at the very bottom. Another common error is using warm ingredients. Let your beans, corn, and rice cool to room temperature before assembling. Your future self will thank you for the crisp lunch.
NUTRITION INFORMATION
- Calories: ~450 (per jar, approximate)
- Protein: 18g
- Carbohydrates: 65g
- Fiber: 15g
- Fat: 14g
(Note: Nutrition is an estimate and can vary based on specific ingredients and brands used.)
FREQUENTLY ASKED QUESTIONS
How long do these mason jar salads last in the fridge?
They keep incredibly well! Properly layered and sealed, they will stay fresh for 3-4 days. I make mine on Sunday for lunches through Wednesday or Thursday.
Can I use a different grain instead of Mexican rice?
Absolutely! This is a great way to mix it up. I’ve used cilantro-lime quinoa, plain brown rice, or even couscous. Just make sure whatever grain you use is cooled before layering.
My jar seems really full. Is that okay?
Yes, that’s perfect! A tightly packed jar means less air inside, which helps everything stay fresher. Just make sure you can still screw the lid on securely.
Leave a Reply! (I’d Love to Hear From You!)
Did you give these burrito bowl jars a try? I want to hear all about your creations! What delicious twists did you add? If you loved this vegetarian version, you must try the ultimate protein-packed option: Mason Jar Chicken Burrito Bowls: Your Easy Meal Prep Win!. Tell me in the comments below—your ideas might just inspire my next batch. Happy prepping, friends!