Give it up, my sweet friend! You cannot resist the magic of these DIY Yogurt Melts. Come to Mama!

I am literally obsessed. I dream about these little clouds of creamy, tangy goodness. They are the ultimate healthy snacks hack, and I am here to scream it from the rooftops!
If you need easy snacks that are also secretly packed with protein, you have found your new best friend. These are the healthy snacks for kids (and adults!) that you’ve been searching for. Let’s make some magic!
Recipe Overview
- Cuisine: N/A (A Healthy Treat!)
- Category: Snack
- Prep Time: 10 minutes
- Cook Time: 2-3 hours (dehydrating/freezing)
- Total Time: 3 hours (mostly hands-off!)
- Servings: Makes about 60-80 melts
Do You Love This Recipe Too?
Okay, real talk. My niece used to turn her nose up at everything. I was on a mission to find healthy toddler snacks she would actually eat.
DIY Yogurt Melts Recipe
Let’s Get Your Ingredients Ready
Bringing This Recipe to Life (Step-by-Step)
Notes
Enjoy your homemade DIY Yogurt Melts Recipe!
I tried one store-bought yogurt bite. It was so sweet and had a weird aftertaste! I knew we could do better. So I got into my kitchen lab.
The first time I made these, she ate an entire batch in one sitting. Her little face was covered in yogurt dust. She looked at me and said, “More, please!” My heart exploded. That’s when I knew this recipe was pure gold.
My Shopping List for This Recipe
I keep it so simple. You really only need two superstar ingredients to make the magic happen. That’s it!
No weird binders or fillers. Just real, yummy food. Let’s grab our stuff and get started!
Let’s Get Your Ingredients Ready
Double-check you have everything! This is the fun part.
- 2 cups thick, plain Greek yogurt (Full-fat is best for creamy melts!)
- 2-3 tablespoons pure fruit puree OR 1 teaspoon vanilla extract (Optional, but so good!)
- Tiny pinch of salt (Trust me, it makes the flavor pop!)
Bringing This Recipe to Life (Step-by-Step)
Put on some fun music! This is the easiest “cooking” you’ll ever do. I promise it’s foolproof.
- Line a large baking sheet with parchment paper or a silicone baking mat. This is non-negotiable for easy removal!
- In a medium bowl, mix your Greek yogurt. If you’re using fruit puree or vanilla, stir it in now. Add that tiny pinch of salt.
- You want a smooth, thick, spoonable mixture. It should hold its shape nicely.
- Now, transfer your yogurt to a piping bag or a plastic zip-top bag. Snip a very small corner off the bag.
- Pipe small dots (about the size of a nickel) onto your prepared baking sheet. Leave a little space between them.
- Here’s your choice! For chewy melts: Dehydrate at 135°F (57°C) for 2-3 hours. For frozen melts: Freeze flat for 2-3 hours.
- Once they’re solid, pop them off the sheet! Store them right away so they stay perfect.
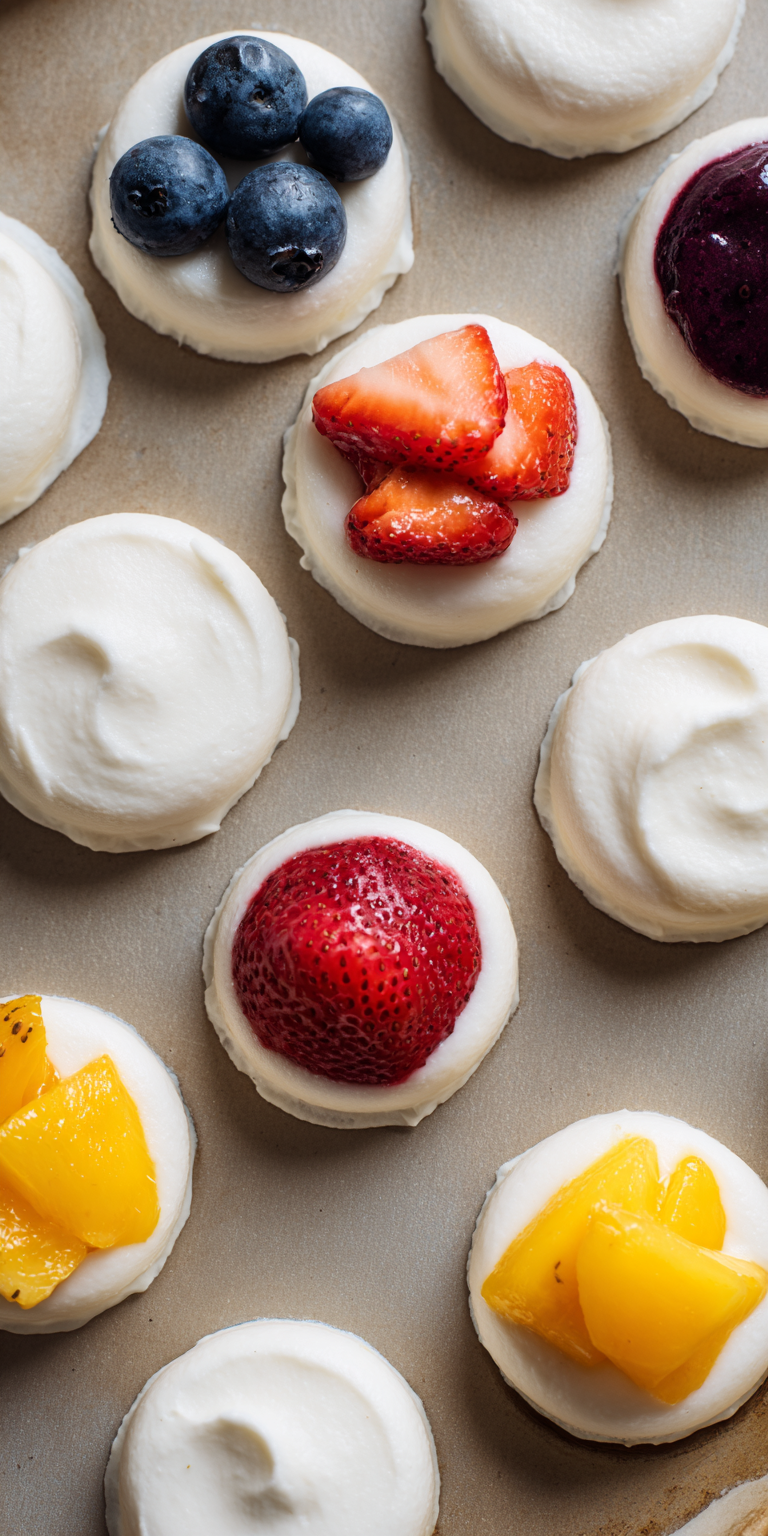
Fun Variations to Try Next Time
Got the basic recipe down? Let’s play! These are my favorite twists.
First, try mixing in a tablespoon of peanut butter powder or cocoa powder. It’s a protein-packed chocolate dream!
Second, swirl in a little berry jam before piping. You get gorgeous, marbled yogurt bites that are so pretty.
Finally, after piping, sprinkle on some chia seeds or crushed freeze-dried strawberry dust. Extra crunch, extra nutrients! This is how you can create fun variations like strawberry yogurt bites.
How to Store, Freeze, and Reheat
You’ve made them! Now, let’s keep them yummy.
For dehydrated melts: Store in an airtight container in the fridge for up to a week. They might get a tiny bit sticky, but they’re still delicious!
For frozen melts: Keep them in a freezer bag or container for up to 3 months. Eat them straight from the freezer—they’re like tiny ice cream bites!
There’s no need to reheat. These are meant to be enjoyed cold or frozen. A perfect quick snack straight from the fridge or freezer!
NUTRITION INFORMATION
- Serving Size: About 10 melts
- Calories: ~35
- Protein: 5g
- Carbohydrates: 2g
- Sugar: 1g (natural from yogurt/fruit)
- Fat: 0.5g
A Quick Q&A on This Recipe
Can I use regular yogurt instead of Greek?
You can try, but it must be super thick! Greek yogurt has less water, which is key. If you use regular yogurt, strain it in a cheesecloth for an hour first. Otherwise, you’ll have a puddle, not a melt!
My toddler is obsessed! Can I make these for school snacks?
YES! This is my top trick. For dehydrated ones, pack a small container in their lunchbox. For frozen ones, they’ll thaw slightly by lunch and are still cold and safe. It’s a winning healthy sweets swap! If you’re looking for another great lunchbox idea, try my easy yogurt toast.
Are these really bariatric friendly?
Absolutely! I’ve had so many readers tell me this. They are high in protein, low in sugar, and the perfect soft, portion-controlled treat. Just be sure to use sugar-free flavorings if needed. They are a total win!
See? I told you this recipe was a game-changer. It solves so many snack-time problems in one go.
You get homemade snacks that you feel great about. The kids get fun snacks for kids they actually beg for. It’s a miracle!
I am dying to know what you think. Did your family go crazy for them? What fun flavor did you try? I read every single comment. I can’t wait to hear how yours turns out! Please leave a comment and a rating below to let me know what you think!